Monday, March 04, 2013
@property support in gcc
In the meantime, latest Debian 6.0 squeeze only includes gcc 4.3 and 4.4. How long till Debian 7?
BTW, there is also a project to support GTK+ bindings for objective-c, but it does not seem to be actively supported.

Thursday, February 17, 2011
MPM
In my mod-python/apache based server implementation at some point I generate certain amount of data (from MySQL database) used in processing user input. This generation takes a while (~10 secs on my development server, ~30 secs on production VPS-based server) and is virtually unchanged from one invocation to the next. Why can't I save it in a disk cache and use it instead? OK, I tried just that.
You can imagine my surprise when I realized that reading from cache took exactly same time as original data generation! How is it even possible?
It turned out that the reason for this phenomenon was that my data consisted mostly of complied Python RE's (regular expressions). However, Python's underlying serialization engine ("pickle") cannot save compiled RE's; when you try to, on the pickle.load() call these RE's will be automatically (re-)compiled. This is what I experienced: most of the time which I initially attributed to DB access and processing results was in fact spent compiling RE's. When I switched to file cache, I gained nothing: same RE's were recompiled again on cache load.
Why such limitation? No one is really sure, however, this is exactly how things are at the moment:
Q: Is it possible to store these regular expressions in a cache on disk in a pre-compiled manner to avoid having to execute the regex compilations on each import?
A: Not easily. You'd have to write a custom serializer that hooks into the C sre implementation of the Python regex engine. Any performance benefits would be vastly outweighed by the time and effort required.
So what should or could I do to optimize my server? It is really annoying to have to wait half a minute every time for a server to generate the same data over and over again.
Looking for an answer to this question, I turned to mod-pyton documentation, section on session management. It appears that mod-python supports three kinds of section management engines: MemorySession, DbmSession, FileSession; naturally, MemorySession implements persistent storage in memory, whereas DbmSession and FileSession are essentially different ways to provide disk-based caching.
Now, there is little doubt that said caching will use internally Python's standard pickle engine, which will take me back exactly to square one.
Can I use MemorySession? mod-python "Session" implementation can make a determination which session engine to use. Documentation has this to say regarding when MemorySession is chosen:
If session type option is not found, the function queries the MPM and based on that returns either a new instance of DbmSession or MemorySession. MemorySession will be used if the MPM is threaded and not forked (such is the case on Windows), or if it threaded, forked, but only one process is allowed (the worker MPM can be configured to run this way). In all other cases DbmSession is used.
What is it talking about, and what is "MPM"? It took me a while to figure that out. MPM in fact stands for Multi-Processing Module and it has to do with how apache distributes incoming requests. Borrowing an excellent explanation from here,
Apache can operate in a number of different modes dependent on the platform being used and the way in which it is configured. This ranges from multiple processes being used with only one request being handled at a time within each process, to one or more processes being used with concurrent requests being handled in distinct threads executing within the same process or distinct processes.
The UNIX "prefork" Mode
This mode is the most commonly used. It was the only mode of operation available in Apache 1.3 and is still the default mode on UNIX systems in Apache 2.0 and 2.2. In this setup, the main Apache process will at startup create multiple child processes. When a request is received by the parent process, it will be handed off to one of the child processes to be handled.
The UNIX "worker" Mode
The "worker" mode is similar to "prefork" mode except that within each child process there will exist a number of worker threads. Instead of a request being handed off to the next available child process with the handling of the request being the only thing the child process is doing, the request will be handed off to a specific worker thread within a child process with other worker threads in the same child process potentially handling other requests at the same time.
You can find out which mode is used by these function calls (from mod-python request handler)
threaded = apache.mpm_query(apache.AP_MPMQ_IS_THREADED)
forked = apache.mpm_query(apache.AP_MPMQ_IS_FORKED)
The last question is, how to switch from one mode to another? In debian, simply install one of apache2-mpm-XXX packages:
debian-linux% apt-cache search ^apache2-mpm
apache2-mpm-itk - multiuser MPM for Apache 2.2
apache2-mpm-event - Apache HTTP Server - event driven model
apache2-mpm-prefork - Apache HTTP Server - traditional non-threaded model
apache2-mpm-worker - Apache HTTP Server - high speed threaded model
I am not sure what apache2-mpm-event is, but apache2-mpm-prefork and apache2-mpm-worker, when installed, will automatically uninstall (!) the other one and automatically make changes to /etc/apache2/apache2.conf to turn on respective mode, like that:
# worker MPM
# StartServers: initial number of server processes to start
# MaxClients: maximum number of simultaneous client connections
# MinSpareThreads: minimum number of worker threads which are kept spare
# MaxSpareThreads: maximum number of worker threads which are kept spare
# ThreadsPerChild: constant number of worker threads in each server process
# MaxRequestsPerChild: maximum number of requests a server process serves
<IfModule mpm_worker_module>
    StartServers          2
    MaxClients          150
    MinSpareThreads      25
    MaxSpareThreads      75
    ThreadsPerChild      25
    MaxRequestsPerChild   0
</IfModule>
All that remains is to add somewhere to apache configuration
PythonOption mod_python.session.session_type MemorySession
... and verify it in Python code
if req.get_options().get('mod_python.session.session_type') == MemorySession and \
   apache.mpm_query(apache.AP_MPMQ_IS_THREADED) != 0

   # using persistent storage
   session = Session.Session(req)
   ......................
And that's it - the processing which used to take half a minute now done in a fraction of a second!
Labels: apache, debian, development, linux, mod-python, python, server
Thursday, February 26, 2009
Debian 5 Lemmy
Tried installing new Debian version, just released.
Looks fine, except that it does seem slow (but my impression might be subjective), and there are number of points to be taken into account when using as VMware guest under VMware 6.5 (the latest versions as of now):
- You need to install Linux headers and "make" utility, like that:
# apt-get install make linux-headers-$(uname -r)
Some also recommend installing
# apt-get install build-essential psmisc automake
- You need to use 4.1 compiler, and not "default" 4.3, so prior to running ./vmware-install.pl do this
# export CC=/usr/bin/gcc-4.1
- Module vsync fails to compile with these messages:
Building modules, stage 2.
MODPOST 1 modules
WARNING: "VMCIDatagram_CreateHnd" [/tmp/vmware-config0/vsock-only/vsock.ko] undefined!
WARNING: "VMCIDatagram_DestroyHnd" [/tmp/vmware-config0/vsock-only/vsock.ko] undefined!
Building modules, stage 2.
MODPOST 1 modules
WARNING: "VMCIDatagram_CreateHnd" [/tmp/vmware-config0/vsock-only/vsock.ko] undefined!
WARNING: "VMCIDatagram_DestroyHnd" [/tmp/vmware-config0/vsock-only/vsock.ko] undefined!
WARNING: "VMCIEvent_Subscribe" [/tmp/vmware-config0/vsock-only/vsock.ko] undefined!
WARNING: "VMCI_DeviceGet" [/tmp/vmware-config0/vsock-only/vsock.ko] undefined!
WARNING: "VMCIMemcpyFromQueueV" [/tmp/vmware-config0/vsock-only/vsock.ko] undefined!
WARNING: "VMCIQueuePair_Detach" [/tmp/vmware-config0/vsock-only/vsock.ko] undefined!
WARNING: "VMCI_GetContextID" [/tmp/vmware-config0/vsock-only/vsock.ko] undefined!
WARNING: "VMCIDatagram_Send" [/tmp/vmware-config0/vsock-only/vsock.ko] undefined!
WARNING: "VMCIQueuePair_Alloc" [/tmp/vmware-config0/vsock-only/vsock.ko] undefined!
WARNING: "VMCIEvent_Unsubscribe" [/tmp/vmware-config0/vsock-only/vsock.ko] undefined!
WARNING: "VMCIMemcpyToQueueV" [/tmp/vmware-config0/vsock-only/vsock.ko] undefined!
CC /tmp/vmware-config0/vsock-only/vsock.mod.o
LD [M] /tmp/vmware-config0/vsock-only/vsock.ko
make[1]: Leaving directory `/usr/src/linux-headers-2.6.27-7-generic'
cp -f vsock.ko ./../vsock.o
make: Leaving directory `/tmp/vmware-config0/vsock-only'
Unable to make a vsock module that can be loaded in the running kernel:
insmod: error inserting '/tmp/vmware-config0/vsock.o': -1 Unknown symbol in module
Apparently, this is known problem which should not by itself cause any noticable problems. Relevant internet threads: [1], [2].
- After performing standard installation, mouse pointer is not going to move between guest and host as it should. This can be fixed by adding one line "Option "CorePointer" to relevant portion of your /etc/X11/xorg.conf file, so it would look like that:
Section "InputDevice"
        Identifier      "VMware Mouse"
        Driver          "vmmouse"
        Option          "CorePointer"
        Option          "Device"                "/dev/input/mice"
        Option          "Emulate3Buttons"       "true"
        Option          "ZAxisMapping"          "4 5"
EndSection
(from here)
See also earlier post regarding installing VMware tools under Debian 4.
It seems like that few problems mentioned above notwithstanding, overall process has become simler, e.g. there is no longer any need to manually specify location of Linux headers (though you still must install them manually), mouse wheel works "out of the box", etc.
Sunday, July 27, 2008
Accessing SMB shares under firewall
There are, generally speaking, five "standard" ways to make files on (Linux) server available to clients:
- Using FTP server;
- If sshd is running, files could be accessed with SFTP;
- If Web server is running, WebDAV could be used;
- Using NFS (see earlier port);
- Using SMB-shares.
In principle, last choice - using Samba shares - is supposed to be most "native" with respect to Windows clients; let's consider how difficult it is to use it practically...
For the following, we assume that SMB server is running on "SERVER" and we'll be using it to access file of local regular user "user".
1. Install and configure samba
1.1. Install
# apt-get install samba smbclient
1.2. Modify config file.
Here we zero in on "minimalistic" approach, which only requires minimal changes to default config file (as distributed with Debian, anyway). It has one built-in share "homes" which provides access to each user's home directory (it is enabled by default, but in read-only mode)
1.2.1. Backup default config file:
cp /etc/samba/smb.conf /etc/samba/smb.conf.original
1.2.2. Modify global settings:
workgroup = <Enter some name>
interfaces = <enter some interfaces from /sbin/ifconfig, e.g. lo venet0:0>
printcap name = /dev/null (shut down all complaints in logs about printers)
encrypt passwords = yes (or else you won't connect from Windows NT and up)
security = user (this should be the default anyway)
smb passwd file = /etc/samba/smbpasswd (see below why/when this is necessary)
1.2.3. Modify setting for share.
If you are satisfied with read-only access to user's directory, there is nothing more to change. If you want read-write access, there are some settings to adjust:
writable = yes
create mask = 0644
directory mask = 0755
Note on "encrypt password": if encrypt password = false, you don't need "smb passwd file", system password file will be used. For some reason it did NOT work for me if "encrypt password = true". As suggested in [8], I did this:
cat /etc/passwd | mksmbpasswd > /etc/samba/smbpasswd
smbpasswd user (for each use who needs his home dir access via SMB)
1.2.4. Restart server:
/etc/init.d/samba restart
1.2.5. Test installation (on the server as user)
smbclient //localhost/homes
If you can, test from another location which does not block outgoing ports 139, 445
smbclient //SERVER/homes -U user
2. Setup Windows computer
In principle, the following command
net use [<drive letter>:] \\SERVER\homes /user:user /persistent:no
should be able to mount corresponding share. However, for this to work it is necessary that client computer had direct access to server using ports 139 and/or 445. If server is to be used in local subnet, this is undoubtedly so and no more setup is required. However, if you are accessing server from the Internet, and your ISP is blocking these ports (like RCN), read on.
The idea is to try to mount SMB shares on SERVER as if they were available on localhost; intercept requests made on (local) ports 139 and 445 and somehow forward them to SERVER.
This however appears to be more difficult than it sounds. The problem is, Windows by default binds all adapters on port 445 :
> netstat -ano | grep 445
TCP 0.0.0.0:445 0.0.0.0:0 LISTENING 4
and the only way to make this port available for binding is to disable NetBios completely, which is rather pointless, since then you won't be able to amount anything at all (if, however, you want to play with this, refer to [5] and [6]).
Fortunately, however, usually Windows, after failing to mount using port 445, falls back to port 139, which apparently you can bind, albeit not on "standard" loopback adapter 127.0.0.1; (well, you can bind to it, but it won't work for whatever reason), thus necessity to create new loopback connection. This "fallback" logic is in no way guaranteed and moreover has reportedly been broken by a recent Vista patch; but at least on XP this seems to work, as long as you implement 2.1 and 2.2 below.
2.1. If you are using Windows XP, install this Windows patch [3].
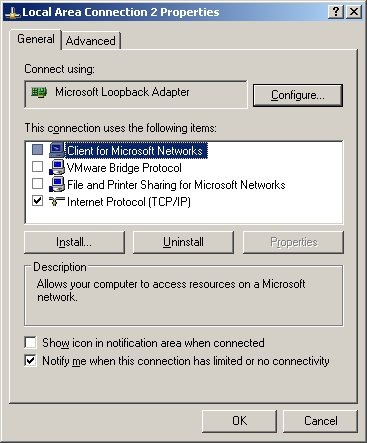 2.2. For your existing Internet connection, enable option "EnableBIOS over TCP/IP" (in fact, it may be sufficient to do so for any Internet connection. Quoting from [1]: "It also appears that if there are no valid interfaces with NetBIOS over tcp enabled, then windows will not attempt to use port 139")
2.3. Add new Microsoft loopback interface and bind it to port 10.0.0.1, see [4] and [1] ([4] has some screenshots from Vista; XP installation is similar).
2.4. It may or may not be necessary, but I also (a) disabled all "items" for new 10.0.0.1 loopback connection (except TCP/IP, see first screenshot above) ; (b) enabled LMHOSTS lookup; (c) disabled NetBIOS over TCP/IP (see second screenshot) ; (d) disabled "File and 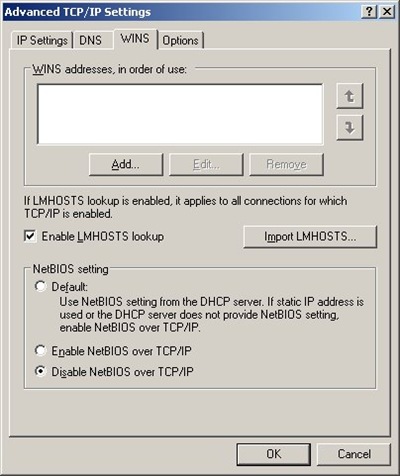 Printer Sharing for Microsoft Networks" for ALL connections;
2.5. Reboot and you are all set!
3. Setup port forwarding
This can be done in one of the two ways.
You can use of the many existing utilities for port forwarding. (It is more correct in fact to speak of reversed port forwarding, but people usually call it port forwarding all the same). In this case you need a (non-blocked) port to forward to, and your Samba server should be told to listen on this port.
Alternatively, you can use ssh port tunneling capability and tunnel port 139 through ssh. This requires more complicated setup and is more difficult to automate, but does not require any additional port to be used and has an additional benefit of securing your Samba traffic via ssh.
3.1. Using ssh tunneling.
3.1.1. With Cygwin (or similar CLI) ssh:
ssh -L 10.0.0.1:139:localhost:139 SERVER
3.1.2. Using PuTTY
(see screenshot in [4]). There are various ways to automate this using pageant, but I won't get into this here.
3.2. Using port forwarding.
3.2.1. Add another option to smb.conf :
smb ports = 445 139 8445 8139
3.2.2. Configure AUTAPF (shareware) or PassPort (Open Source) to forward port 139 on local adapter 10.0.0.1 to port 8139 on SERVER.
AUTAPF is more convenient as it immediately tells you if it can't bind a port thus it is better for testing; once you are comfortable with the setup, you can switch to free PassPort.
4. Using SMB shares
4.1. Under Windows
net use [<drive letter>:] \\10.0.0.1\homes /user:user /persistent:no
(Unless user if Windows user name and password matches, you'll be asked to enter server password at this point)
4.2. Under Linux
Make sure you have "smbfs" installed ("apt-get install smbfs") and issue this command as super-user:
mount -t smbfs -o username=user%<user password>,uid=<local username>,port=8139 //SERVER/homes <local mount point>
(You can use option -credential in place of plain text user name/password, see "man smbmount" and this page)
4.3. Using smbclient, any platform
For any platform which has utility "smbclient" or equivalent, and provided that you've configured SMB server to listen to port 8138, you can use this
smbclient //SERVER/homes -U user -p 8139
to access your files.
You can get MinGW-based smbclient.exe for Windows from here (it works fine except that you have to specify password in the command line); alternatively, you can build your own Cygwin-based version using one of the patched published here (you'll need to disable first test in Samba source file source/tests/summary.c)
References:
[1] Sharing (tunneling) Samba/CIFS/SMB file systems over SSH
[2] How to tunnel Samba via ssh from Windows XP without having to disable local NetBIOS
[3] Programs that connect to IP addresses that are in the loopback address range may not work as you expect in Windows XP Service Pack 2
[4] Vista or XP Accessing Samba shares securely over SSH
[5] Disabling Port 445 (SMB) Entirely
[6] After you disable the "Client for Microsoft Networks" option for a dial-up connection, the dial-up connection is still active on a Windows XP-based computer
[7] "Network Location Cannot be Reached" when accessing shares
[8] SMBCLIENT CONNECTION ERROR
Labels: debian, linux, Samba, server, SMB, windows
Sunday, July 20, 2008
Installing TTF fonts under Debian
I am still not sure I am fully understand the inner workings of fonts under Linux; using hints from this page, here is how I recently installed RedHat Liberations fonts under Debian:
cd /tmp
# using link from https://fedorahosted.org/liberation-fonts
wget https://fedorahosted.org/releases/l/i/liberation-fonts/liberation-fonts-1.04.tar.gz
tar -xvzf liberation-fonts-1.04.tar.gz
cd liberation-fonts-1.04
# remove everything except font *.ttf files
rm `ls -1 | grep -iv \.ttf$`
# I prefer to install under /usr/local, but it's irrelevant
mkdir -p /usr/local/share/fonts/truetype
cp -pr /tmp/liberation-fonts-1.04  /usr/local/share/fonts/truetype/liberation-fonts
# defoma is Perl-based; for some reason, some required Perl dependencies weren't
# installed by default
apt-get install libft-perl
defoma-hints -c --no-question truetype \
            /usr/local/share/fonts/truetype/liberation-fonts/* >
            /etc/defoma/hints/liberation-fonts.hints
defoma-font register-all /etc/defoma/hints/liberation-fonts.hints
defoma-reconfigure
xset fp rehash
I just hope one day I'll understand what all of that really means....
Labels: debian, fonts, linux, redhat
Tuesday, May 20, 2008
32-bit MPlayer on 64-bit Linux, again
Almost exactly one year ago, I published here an essay on building 32-bit mplayer on 64-bit RHE Linux (took me a lot of time when, actually). Reading this over a year later, I can hardly understand how I really managed to do it and how the process worked; it must have been some magic which mplayer configuration did. Anyway, here is much more straightforward and comprehensive approach on building not just mplayer, but whole 32-bit Linux (sub-) system within existing 64-bit OS. It is based on Ubuntu 8.04 "Hardy Heron" , but should work with small modifications on any Debian-based system.
The following largely based on this forum post, which in turn references this tutorial. I will assume that code name of your release is "hardy" and 32-bit root is "/sys32"; make sure to replace with values suitable for your system.
- sudo apt-get install dchroot debootstrap
- sudo mkdir /sys32/
- sudo vi /etc/dchroot.conf
- Add this line: hardy /sys32
- sudo debootstrap --arch i386 hardy /sys32/ http://archive.ubuntu.com/ubuntu
- sudo cp /etc/{passwd,shadow,group,sudoers,hosts} /sys32/etc/
- sudo cp /etc/apt/sources.list /sys32/etc/apt/sources.list
(At this moment you might want to edit your sources.list file to your taste, or remove from there things that are specific to 64-bit system, not that there should be any)
Now comes some controversial step. Full-blown debian installation could take gigabytes of disk space, and only small piece of that is binary data which is different for 32-bit. You can reduce the required disk space by "sharing" certain folders with architecture-independent data between the main system and sub-system, but that has also a site-effect of making certain actions in the sub-system break how things work in your main system. Forum post that I referenced above recommend you share /usr/share/fonts this way, but I decided against it; it costs me about 200Mb more, but adds certain piece of mind. Some directories though are worth sharing.
- sudo vi /etc/fstab
- Add the following lines:
- /home /chroot/home none bind 0 0
- /tmp /chroot/tmp none bind 0 0
- /dev /chroot/dev none bind 0 0
- /proc /chroot/proc proc defaults 0 0
- /media/cdrom0 /chroot/media/cdrom0 none bind 0 0
- sudo mkdir /chroot/media/cdrom0
- sudo mount -a
OK, by now you should have a basic Debian-style 32-bit system under /sys32; this command
- sudo chroot /sys32/
would switch you to operate from "within" this sub-system. From this point on, we continue setup from within (note that "chroot" automatically puts us into root-privileged shell, so "sudo" isn't needed)
- locale-gen "en_US.UTF-8"
- dpkg-reconfigure locales
- apt-get update
- apt-get upgrade
- apt-get install libgtk2.0-dev gcc g++ make
The last command is just an example; feel free to install whatever you feel like you need, including software built from source, or anything else. MPlayer, among other things, could be built this way without any problems.
Note that when installing from source, it may be useful to do everything but the last installation step from your regular user account, like that:
- [Download all source you might want]
- sudo chroot /sys32/
- su - your_user_account
- cd /tmp
- tar -xvzf your_sources.tag.gz
- cd your_sources
- ./configure
- make
- make test
- exit
- cd /tmp/your_sources
- make install
One last remark: you can install some 32-bit support as part of your 64-bit system, including compiler and run-time libraries (you can't however get build libraries and headers other than building them yourself following steps similar to outlined above). Here it is:
- apt-get install build-essential lib32gcc1 libc6-dev-i386 libc6-i386 lib32stdc++6 ia32-libs gcc-multilib
This makes it possible to run gmplayer as /sys32/usr/local/bin/gmplayer, without any change in environment or any dependencies on the 32-bit subsystem.
Labels: 64-bit, debian, mplayer
Friday, April 04, 2008
Global $PATH with Debian
Let's say I want to add new directory to "global" system $PATH. That is, I want all applications, no matter how started, from the command line or from GUI, no matter by what user, is to be able to find executables in certain directory, among others like "/usr" or "/usr/local/bin".
Interestingly, there is no simple or at least standard way of accomplishing this simple task.
On a very basic level, there are two main "sources" of the environment
1. Shell initialization file, system-wide or per-user. For "bash", these are:
/etc/bash.bashrc
/etc/profile
~/.bashrc
~/.profile
~/.bash_profile
It is important that all files from this list which have "profile" in their names are only invoked by "login" shells; that is, only for shells which are invoked when user logins remotely to the system or for shells started with "--login" (or just "-l") command line options.
2. Various "display managers", like GDM = "Gnome Display Manager".
Now, here is a tricky part: I could not figure it out how GDM sets it environments. Environment itself which comes out from GDM is actually identical to that set up in file /etc/login.defs, but changing said file appears to have no effect.
However, there is another file which GDM appears to honor: /etc/environment (note that this is NOT a bash script, but a simple configuration file). And yes, you can add PATH definition there and GDM will use it with no interference.
The only problem is that GNOME (and all other modern desktops) have a feature "run as root", and that requires different environment (again, I believe default one is identical to one defined in /etc/login.defs).
Given this situation, there are two basic strategies to define your system $PATH. You can of course customize both to fit your needs.
Approach 1 is described here.
The basic idea is that if there is a local user-defined executable file ~/.xsession, GDM will invoke it when firing up default user session. Therefore, this ~/.xsession file
#! /bin/bash --login
exec x-session-manager
makes sure windows environment is consistent with login environment.
Of course, you can change header to simply "#! /bin/sh" and set any environment you want in the same file before invoking x-session-manager.
Approach 2
Set your global $PATH in /etc/environment, but then make sure it is good both for regular login and applications requiring super-user privileges. Here is mine:
PATH=/usr/local/bin:/opt/jdk/bin:/usr/bin:/bin:/usr/bin/X11:/usr/games:/sbin:/usr/sbin
You can and probably should customize your bash configuration files to set local $PATH for user (by default, file ~/.bash_profile prepends "~/bin" to $PATH)
Friday, March 07, 2008
Installing VMWare tools under Debian
- Make sure you have correct version of kernel headers installed. Under Debian, this is done with the command:
# apt-get install linux-headers-2.6.18-6-686
where version string is reported by "uname -r".
While traditional location for linux header files was under /usr/src/linux, Debian puts them under /usr/src/linux-headers-2.6.18-6-686/include (you will need this directory later in the installation process)
Note: Aforementioned apt-get command would also create directory /usr/src/linux-headers-2.6.18-6 with platform-independent files.
- Go to virtual machine settings and specifically enable "shared folders", if not already enabled (you do not need to add any such folders)
- Now select in VMWare menus: VM => Install VMware tools.
- In a few seconds, VMWare will mount VMWare tool installation "CD" (you will probably see CD image on the desktop and top-level folder opened). Ignore '.rpm' file and unpack '.tar.gz' file under '/tmp':
# cd /tmp
# tar -xvzf /media/cdrom0/VMwareTools-6.0.2-59824.tar.gz - Start installation process:
# cd vmware-tools-distrib
# ./vmware-install.pl
It will proceed for a while before beginning to ask questions about where to install files. Accept all of the suggested defaults. - After all the files are installed, installer asks if you want to launch VMWare configuration tool /usr/bin/vmware-config-tools.pl . Say "yes" (the default)
- Here comes the only time when you (might) need to override default. When asked about "C header files that match your running kernel", specify directory "/usr/src/linux-headers-2.6.18-6-686/include" (or similar) from step 1.
- Agree to install "experimental" feature "Virtual Machine Communication Interface".
- When selecting graphics mode, you screen might re-size and flicker for a few seconds.
- And the end, configuration utility shall start the services and report successful installation. Make sure that status line at the bottom of VMWare application window says "VMware tools installed successfully".
- Configuration utility might suggest to switch to vmxnet for network support, like that:
/etc/init.d/network stop
/sbin/rmmod pcnet32
/sbin/rmmod vmxnet
# /sbin/depmod -a (may be unnecessary)
/sbin/modprobe vmxnet
/etc/init.d/network start
- As part of the installation, installer overrides your existing X.org configuration file. You have previously configured your scroll mouse, these changes are now lost (though there should be a backup file /etc/X11/xorg.conf.old.0 available).
To make scroll mouse work again, restore these changes to /etc/X11/xorg.conf :
Option "Protocol" "ImPS/2"
Option "Emulate3Buttons" "false"
Option "Buttons" "5"
Option "ZAxisMapping" "4 5"
(from http://communities.vmware.com/thread/107816) - Shut down and them power up viertual machine to enable changes to xconf.org to take effect and to make sure VMware services are properly restarted (do not just 'reboot')
- Upon successful startup, test scroll mouse and copy/paste between host and guest (if enabled in virtual machine properties, of course), and use /usr/bin/vmware-toolbox to make further adjustments to the configuration.
Update (24-Jun-2008). If when invoking "install VMware tools" you get CD mounted with some garbage (instead of two installer files it is supposed to contain), then: (1) "Eject" this CD (e.g., with desktop CD icon using RMB); (2) Go to VM => "Cancel VMware tools install"; (3) Go to VM => "Install VMware Tools" again. This time it should work.

