Monday, March 04, 2013
@property support in gcc
In the meantime, latest Debian 6.0 squeeze only includes gcc 4.3 and 4.4. How long till Debian 7?
BTW, there is also a project to support GTK+ bindings for objective-c, but it does not seem to be actively supported.

Thursday, February 17, 2011
MPM
In my mod-python/apache based server implementation at some point I generate certain amount of data (from MySQL database) used in processing user input. This generation takes a while (~10 secs on my development server, ~30 secs on production VPS-based server) and is virtually unchanged from one invocation to the next. Why can't I save it in a disk cache and use it instead? OK, I tried just that.
You can imagine my surprise when I realized that reading from cache took exactly same time as original data generation! How is it even possible?
It turned out that the reason for this phenomenon was that my data consisted mostly of complied Python RE's (regular expressions). However, Python's underlying serialization engine ("pickle") cannot save compiled RE's; when you try to, on the pickle.load() call these RE's will be automatically (re-)compiled. This is what I experienced: most of the time which I initially attributed to DB access and processing results was in fact spent compiling RE's. When I switched to file cache, I gained nothing: same RE's were recompiled again on cache load.
Why such limitation? No one is really sure, however, this is exactly how things are at the moment:
Q: Is it possible to store these regular expressions in a cache on disk in a pre-compiled manner to avoid having to execute the regex compilations on each import?
A: Not easily. You'd have to write a custom serializer that hooks into the C sre implementation of the Python regex engine. Any performance benefits would be vastly outweighed by the time and effort required.
So what should or could I do to optimize my server? It is really annoying to have to wait half a minute every time for a server to generate the same data over and over again.
Looking for an answer to this question, I turned to mod-pyton documentation, section on session management. It appears that mod-python supports three kinds of section management engines: MemorySession, DbmSession, FileSession; naturally, MemorySession implements persistent storage in memory, whereas DbmSession and FileSession are essentially different ways to provide disk-based caching.
Now, there is little doubt that said caching will use internally Python's standard pickle engine, which will take me back exactly to square one.
Can I use MemorySession? mod-python "Session" implementation can make a determination which session engine to use. Documentation has this to say regarding when MemorySession is chosen:
If session type option is not found, the function queries the MPM and based on that returns either a new instance of DbmSession or MemorySession. MemorySession will be used if the MPM is threaded and not forked (such is the case on Windows), or if it threaded, forked, but only one process is allowed (the worker MPM can be configured to run this way). In all other cases DbmSession is used.
What is it talking about, and what is "MPM"? It took me a while to figure that out. MPM in fact stands for Multi-Processing Module and it has to do with how apache distributes incoming requests. Borrowing an excellent explanation from here,
Apache can operate in a number of different modes dependent on the platform being used and the way in which it is configured. This ranges from multiple processes being used with only one request being handled at a time within each process, to one or more processes being used with concurrent requests being handled in distinct threads executing within the same process or distinct processes.
The UNIX "prefork" Mode
This mode is the most commonly used. It was the only mode of operation available in Apache 1.3 and is still the default mode on UNIX systems in Apache 2.0 and 2.2. In this setup, the main Apache process will at startup create multiple child processes. When a request is received by the parent process, it will be handed off to one of the child processes to be handled.
The UNIX "worker" Mode
The "worker" mode is similar to "prefork" mode except that within each child process there will exist a number of worker threads. Instead of a request being handed off to the next available child process with the handling of the request being the only thing the child process is doing, the request will be handed off to a specific worker thread within a child process with other worker threads in the same child process potentially handling other requests at the same time.
You can find out which mode is used by these function calls (from mod-python request handler)
threaded = apache.mpm_query(apache.AP_MPMQ_IS_THREADED)
forked = apache.mpm_query(apache.AP_MPMQ_IS_FORKED)
The last question is, how to switch from one mode to another? In debian, simply install one of apache2-mpm-XXX packages:
debian-linux% apt-cache search ^apache2-mpm
apache2-mpm-itk - multiuser MPM for Apache 2.2
apache2-mpm-event - Apache HTTP Server - event driven model
apache2-mpm-prefork - Apache HTTP Server - traditional non-threaded model
apache2-mpm-worker - Apache HTTP Server - high speed threaded model
I am not sure what apache2-mpm-event is, but apache2-mpm-prefork and apache2-mpm-worker, when installed, will automatically uninstall (!) the other one and automatically make changes to /etc/apache2/apache2.conf to turn on respective mode, like that:
# worker MPM
# StartServers: initial number of server processes to start
# MaxClients: maximum number of simultaneous client connections
# MinSpareThreads: minimum number of worker threads which are kept spare
# MaxSpareThreads: maximum number of worker threads which are kept spare
# ThreadsPerChild: constant number of worker threads in each server process
# MaxRequestsPerChild: maximum number of requests a server process serves
<IfModule mpm_worker_module>
    StartServers          2
    MaxClients          150
    MinSpareThreads      25
    MaxSpareThreads      75
    ThreadsPerChild      25
    MaxRequestsPerChild   0
</IfModule>
All that remains is to add somewhere to apache configuration
PythonOption mod_python.session.session_type MemorySession
... and verify it in Python code
if req.get_options().get('mod_python.session.session_type') == MemorySession and \
   apache.mpm_query(apache.AP_MPMQ_IS_THREADED) != 0

   # using persistent storage
   session = Session.Session(req)
   ......................
And that's it - the processing which used to take half a minute now done in a fraction of a second!
Labels: apache, debian, development, linux, mod-python, python, server
Thursday, October 22, 2009
Simple shell implementation
Just done a simple exercise in C programming and wrote a trivial implementation of Unix-style "shell" utility in C.
The source is here: http://code.google.com/p/inet-lab/source/browse/trunk/utils/Misc/myshell.c
All it does is basically accepts a user's command, parses it into "utility" and "arguments", does a basic sanity check, finds utility in $PATH, forks a child process and executes an utility with arguments via execv().
It also optionally supports GNU readline library and could be compiled e.g. with gcc like that :
gcc -g --pedantic –Wall [-DRL] -o myshell myshell.c [-lreadline]
Double quotes can be used as part of command line to pass a single argument with spaces. Other than that, no other shell substitution or expansion is done; in particular, there is no way to escape a double quote to pass it as part of an argument.
Why would anyone need this primitive shell?
Well, other that a simple training in a few basic C-programming concepts (also serving as a basic GNU readline example), it allows one to create a "back door" bypassing system security. Indeed, if such a "shell" is owned by root and is granted setuid privilege, it allows a regular user to execute any administrative/privileged command, a goal which cannot be accomplished with either regular system shells (which all have built-in protection against setuid flag) or any tools written in a scripting language; it must be a native system executable.
Labels: C, development, linux
Tuesday, July 14, 2009
UbuntuOne

(There isn’t much information (currently) on the official site, other than installation instructions, mailing list and bugs database)
This is a potentially brilliant idea, because it gives people a convenient way to support financially their favorite distribution, and with solid financial support this could become a reliable backup solution. Correct, there may be cheaper options available on the market, but you never know how long they’ll last (Streamload being a good example of that)
On the other hand, as of right now the service is hardly usable.
- It is clearly inferior compared to the popular (among Linux crowd) DropBox service, which provided 5 times more of paid storage, supports versions, has be better UI (web-based and client-side) and is compatible with every modern Linux distributions, Windows and Mac;
- It is still very buggy and incomplete. For example, when I added a file through Web UI, it never showed up in my Ubuntu folder, though synchronization the other way around worked fine;
- There are also browser-compatibility issues, e.g. with Google Chrome;
- Is this service supposed to be open source? I could not find any reference to the server source code anywhere, nor to any plans for future client-side API.
Mailing list appears to be relatively low-volume, and I am not sure many people are actually using this – which, given the modest, at best, progress of development and plenty of competitors, does not promise a bright future for this project any time soon, in my opinion.
But, whatever this is going to turn out, the idea was really a good one.
Labels: internet, linux, Ubuntu, web-services
Sunday, May 31, 2009
Mounting windows shares
Procedures to mount Windows shares from remote machines changed so many times during lifespan of Linux, that an attempt to do a search in Google gives a mix of solutions from using "smbmount" to "mount -t smb".
Here is the latest and greates solution. Make sure you have "smbfs" package installed and do this :
% sudo mount -t cifs //192.168.1.102/share_name /media/my_share -o \
  username=theuser,password=thepass,iocharset=utf8,file_mode=0777,dir_mode=0777
With option "iocharset=utf8" it ought to handle international characters in all Windows NT-based systems. If you need to mount drives from Windows 95/98/Me, different translation options will be necessary.
see this page for more detailed explanations.
Labels: linux, Samba, Ubuntu, unicode, web-services, windows
Sunday, April 26, 2009
WebDAV, problems all around
It seems almost incomprehensible how many problems emerge with simple WebDAV file hosting. While apache DAV server, and clients built-in into both Windows Shell and GNOME have been available fr many years, I still can't make it to work properly.
Here is a brief list of problems:
Apache 2 Server. Its problem is that it is bit difficult to make server work with both "resular" and SSL modes. This typically emerges as failure to "copy", "move" or "rename" file in non-SSL mode, while everything else seems to work.
Good explanation is available here:
The main issue was that the production system runs on https and there was a reverse proxy setup for this system. So, all the "https" requests were converted to "http" at this proxy level and forwarded to the main system. This was the main culprit.
Here is an example of HTTP request for the MOVE resource request for a WebDAV resource. For brevity I removed all unnecessary details.
MOVE contentLocation //request line, some https location, URI of webDAV resource
Destination:destinationLocation // this is the HTTP request header, should be absolute URI according to specifications.Overwrite: "F" // this is also a HTTP request header
So, when the reverse proxy sees the request line, it knows that it has to convert this to HTTP request but the header Destination also contains an HTTPS request which would be ignored by the proxy. So, when the request reached the server, we are moving the resource from an URI which begins with a http to a URI which begins with an https. Server treats this request as a request to move a WebDAV resource from one server location to another server location.(Refer RFC: http://greenbytes.de/tech/webdav/rfc2518.html#METHOD_MOVE). This was the source of the main problem.
Linux/GNOME GVFS driver: Seems to work most of the time,but
- Fails to handle paths with user name "davs://username@server.com/path". "Top listing" is shown correctly, but an attempt to change directory fails. Reason unknown;
- When using drag-and-drop, or "cut/paste" interface, it attempts to "copy" file and then "delete" the original. I could not find any way to invoke "MOVE" command.
Windows (old driver). This is "old" Windows-2000 implementation, which identifies itself as "Microsoft Data Access Internet Publishing Provider DAV". This seems almost the most reliable implementation, and it worked for me for a while, but now it shows directory "Temp" as "temp" (all other directories similarly named are OK), and obviously fails to chdir to it. Reason unknown.
Windows (new driver, XP and newer). Identifies itself as "Microsoft-WebDAV-MiniRedir/5.2.3790". Apparently only intended to work with Microsoft IIS, not compatible with Apache. This pages gives a consice overview:
For implementation of WebDAV on Windows XP and later , MSFT made it's own interpretation of the standard to work best with the Windows IIS servers. The problem due to this is three fold:
- Windows XP authenticates users using the format "domain\username" by the mechanism of "Microsoft-WebDAV-MiniRedir/5.1.2600". Whereas Windows 98SE/2000 authenticates users as "username" using the mechanism of "Microsoft Data Access Internet Publishing Provider DAV 1.1".
- The problem lies with the implementation of "Microsoft-WebDAV-MiniRedir/5.1.2600". If authentication is sent as "domain\username" then it would be received as "usernamedomain" or "usernamehostname" by the Web server and not as "username".
- Also as per "Microsoft Knowledge Base, Article ID: 841215" Windows XP disables "Basic Auth" in its "Microsoft-WebDAV-MiniRedir/5.1.2600" mechanism by default for security reasons. But WebDAV expects "Basic Auth".
There are hundreds pages how to trick it to invoke "old" implementation, including some on the same page mentioned above; there is also a separate discussion regarding Windows Vista, where "old" implementation has to be separately installed. Windows 7 status is unknown.
Platform-independent clients.
- SkunkDAV Java-based client is simple and reliable, but unfortunately I could not make it support SSL-based access;
- Cadaver is CLI-based tool. It seems to work fine.
Update (12-May-09). "Official" subversion book has a list of DAV clients. Among some known clients, some of them mentioned above, there is another Jaba-based client "DAV Explorer", it has been last updated in 2005 and looks a bit better than SkunkDAV, though I can't say there is a big difference.
Also, its help file says that in order to enable SSL in Java one has to run Java with -Dssl=true, and only from version 1.4 on; for earlier versions, one has to download special Java Secure Socket Extensions. It is likely with if run with these options, SkunkDAV will work ok with SSL DAV.
Labels: GNOME, linux, server, Ubuntu, web-services, windows
Friday, February 27, 2009
ls color
Modern Linux distributions are smart enough to support colored "ls" output and even enable that by default, but stupid enough not to adjust it in any way to current terminal color scheme. Default built-in colors "kind of work" for a black-on-white terminal, but should you try to make even small adjustment, some file types quickly become completely unreadable.
At the same time, procedure to customize these colors, while not complicated, is rather poorly documented.
Here are a few simple steps to follow;
- Execute command "dircolors > ~/.dircolors";
- Generated file "~/.dircolors" is self-documented, customize it to your liking;
- Add these lines to your ~/.bashrc file or equivalent:
if [ -f ~/.dircolors ]; then
   eval $(dircolors ~/.dircolors)
fi
That's it!
P.S. You can also disable color output altogether by doing "unalias ls".
Labels: linux
Thursday, February 26, 2009
Debian 5 Lemmy
Tried installing new Debian version, just released.
Looks fine, except that it does seem slow (but my impression might be subjective), and there are number of points to be taken into account when using as VMware guest under VMware 6.5 (the latest versions as of now):
- You need to install Linux headers and "make" utility, like that:
# apt-get install make linux-headers-$(uname -r)
Some also recommend installing
# apt-get install build-essential psmisc automake
- You need to use 4.1 compiler, and not "default" 4.3, so prior to running ./vmware-install.pl do this
# export CC=/usr/bin/gcc-4.1
- Module vsync fails to compile with these messages:
Building modules, stage 2.
MODPOST 1 modules
WARNING: "VMCIDatagram_CreateHnd" [/tmp/vmware-config0/vsock-only/vsock.ko] undefined!
WARNING: "VMCIDatagram_DestroyHnd" [/tmp/vmware-config0/vsock-only/vsock.ko] undefined!
Building modules, stage 2.
MODPOST 1 modules
WARNING: "VMCIDatagram_CreateHnd" [/tmp/vmware-config0/vsock-only/vsock.ko] undefined!
WARNING: "VMCIDatagram_DestroyHnd" [/tmp/vmware-config0/vsock-only/vsock.ko] undefined!
WARNING: "VMCIEvent_Subscribe" [/tmp/vmware-config0/vsock-only/vsock.ko] undefined!
WARNING: "VMCI_DeviceGet" [/tmp/vmware-config0/vsock-only/vsock.ko] undefined!
WARNING: "VMCIMemcpyFromQueueV" [/tmp/vmware-config0/vsock-only/vsock.ko] undefined!
WARNING: "VMCIQueuePair_Detach" [/tmp/vmware-config0/vsock-only/vsock.ko] undefined!
WARNING: "VMCI_GetContextID" [/tmp/vmware-config0/vsock-only/vsock.ko] undefined!
WARNING: "VMCIDatagram_Send" [/tmp/vmware-config0/vsock-only/vsock.ko] undefined!
WARNING: "VMCIQueuePair_Alloc" [/tmp/vmware-config0/vsock-only/vsock.ko] undefined!
WARNING: "VMCIEvent_Unsubscribe" [/tmp/vmware-config0/vsock-only/vsock.ko] undefined!
WARNING: "VMCIMemcpyToQueueV" [/tmp/vmware-config0/vsock-only/vsock.ko] undefined!
CC /tmp/vmware-config0/vsock-only/vsock.mod.o
LD [M] /tmp/vmware-config0/vsock-only/vsock.ko
make[1]: Leaving directory `/usr/src/linux-headers-2.6.27-7-generic'
cp -f vsock.ko ./../vsock.o
make: Leaving directory `/tmp/vmware-config0/vsock-only'
Unable to make a vsock module that can be loaded in the running kernel:
insmod: error inserting '/tmp/vmware-config0/vsock.o': -1 Unknown symbol in module
Apparently, this is known problem which should not by itself cause any noticable problems. Relevant internet threads: [1], [2].
- After performing standard installation, mouse pointer is not going to move between guest and host as it should. This can be fixed by adding one line "Option "CorePointer" to relevant portion of your /etc/X11/xorg.conf file, so it would look like that:
Section "InputDevice"
        Identifier      "VMware Mouse"
        Driver          "vmmouse"
        Option          "CorePointer"
        Option          "Device"                "/dev/input/mice"
        Option          "Emulate3Buttons"       "true"
        Option          "ZAxisMapping"          "4 5"
EndSection
(from here)
See also earlier post regarding installing VMware tools under Debian 4.
It seems like that few problems mentioned above notwithstanding, overall process has become simler, e.g. there is no longer any need to manually specify location of Linux headers (though you still must install them manually), mouse wheel works "out of the box", etc.
Wednesday, October 01, 2008
Mounting USB devices under Linux
For some reason, Ubuntu/Gnome often fails to mount properly USB drives when plugged-in. It is not hard to mount them manually, as long as user has super-user access and remembers necessary commands and options.
To mount anything, one has to know name of corresponding "device" file in "/dev"; under modern Linux, these are typically "/dev/sdc1", "/dev/sdd1", etc.
For some peculiar reason, there is no single utility which would print simple map "Name/manufacturer of USB disk => device file". Rather, there are four utilities which together allow user to accomplish this task:
- "lshw" is the only utility I know of which can print device names. To do that, run it like that:
sudo lshw -businfo | fgrep volume
- "lsusb" can print information about all USB devices (a lot of information with "-v"), including enough hints to identify specific device. It could be used both in "super user" mode and "regular user" mode;
- "fdisk -l" (super-user mode only) can print information about a device (if you have guessed its name).
- Finally, when you have figured out device name and file system type (FAT or NTFS), you run mount in super-user mode like that:
mount -t [vfat|ntfs] <device name, e.g. /dev/sdc1> <empty directory, e.g. /media/mydisk> -o \
     rw,nosuid,nodev,uhelper=hal,shortname=mixed,uid=1000,utf8,umask=077,flush
Options can be adjusted, I believe above is what Gnome uses by default when mount is successful
[sudo] lsusb [-v] sudo fdisk -l /dev/sdc1 sudo lshw -businfo sudo mount -t [vfat|ntfs] /dev/sdc1 /lacie -o rw,nosuid,nodev,uhelper=hal,shortname=mixed,uid=1000,utf8,umask=077,flush
Labels: GNOME, linux, Ubuntu, USB
Monday, September 29, 2008
Samba installation under Ubuntu
In one of the recent posts, I listed some basic steps to configure Samba server under Debian 4; when I tried recently to similarly activate Samba under Ubuntu 8.04, it appeared that due to consistent improvement of Linux distributions, some steps needed to be corrected in some minor ways. Here I list the most important changes for future reference:
- Ubuntu is distributed by default with xinit as opposed to init (xinit has a "compatibility mode" which makes it to read and interpret "init" configuration file, but by default it is not created or updated since "init" is not installed). To enable Samba server under xinit, create file "samba" in directory "/etc/xinetd.d" with this (or similar) content (taking a hint from here):
service netbios-ssn
{
# "port" by default is taken from /etc/services
# port  = 139
 socket_type = stream
 wait  = no
 only_from = 192.168.0.0
 user  = root
 server  = /usr/sbin/smbd
 log_on_failure += HOST
 disable  = no
 mdns  = yes
 instances = 2
}
- There is now option "passdb backend = tdbsam", which is very similar to using "smb passwd file", except that there is no need to use specific file; other than that, you can (and should) use smbpasswd to setup encrypted passwords;
- "Home directory" special share "[homes]" is commented out by default. Uncomment it and make changes as described.
Labels: linux, Samba, server, SMB, Ubuntu
Tuesday, August 12, 2008
The mystery of a plus
Well, today I noticed that "long" listing in one of my directories appends "+" sign to each permissions string, like that:
drwxrwxr-x+ 13 user      500 4096 2008-05-10 02:07 DivX
drwxrwxr-x+ 34 user      500 4096 2008-05-10 08:44 Raw
I was used to seeing this extra plus a lot under Cygwin, and never really gave it much thought always attributing this to some Cygwin peculiarities. But this time around this wasn't Cygwin at all - this was pristine Ubuntu 8.04. Given the specific path where this pluses were present, it was apparent that this is somehow related to Samba - these directories were originally uploaded with Samba daemon. So, I did understand from the get-go that in all likelihood Samba server is assigning some special flag to these files and "ls" is trying to notify me of the existence of this flag. I only need to figure out which specific flag it is (and how to remove it). This should be easy. Or so I thought.
The first page I stumbled upon in Google search had this to say:
The character after permissions is an ACL or extended attributes indicator. This character is an @ if extended attributes are associated with the file and the -@ option is in effect. Otherwise, this character is a plus sign (+) character if a nontrivial ACL is associated with the file or a space character if not.
ACL stands for "Access Control Lists" and allows for some fine-tuning of users' access permission on the level of individual user.
Ok, so what now? Same page listed some ACL-related command line options to ls, like '-v'; none of them was recognized by my ls. Well, that was to be expected since these were options for Solaris ls. How about Linux? No problem, said Google, you can use commands getfacl/setfacl to get/set ACL for a given file.
getfacl does indeed generate some output, but it turned out it does so even in absence of any ACLs, simply interpreting default Unix behavior based on file ownership and permissions. Attempts to set and/or clean ACLs for a file failed, and for a good reason: apparently, in order for ACL to be in effect for a mounted file system, mount option 'acl' must be included, as explained in some details e.g. here.
Fine, so if this is not ACL to blame, how about extended attributes? (Actually, extended attributes is not something parallel to ACLs; ACL implementation is based on extended attributes, which merely allows to attach more or less arbitrary "extended" info to each file in a supported file system; ACL is about how its attributes are to be interpreted by file system and kernel; attributes themselves bear no such interpretation). For one thing, this seemed as unlikely, since to use extended attributes one needs another mount option, "user_xattr". In fact, I didn't even have a package "attr" installed, which provided utilities getfattr/setfattr very similar to getfacl/setfacl.
Nevertheless, I installed the package and tried running getfattr on my files. None, as expected.
At this point in time I decided that the fastest way to get to the bottom of this puzzle was to look at the source of "ls" to see what kind of test makes it decide to append this extra "plus".
This was surprisingly simple enough to do; though this is somewhat off-topic, here is a brief overview what I did to compile my own debuggable "ls", for future references:
- Install packages dbs and debhelper (for build);
- Install packages xxgdb or ddd (for debugging);
- Run command "dpkg -S `which ls`" to figure out which package "ls" belongs to. It is "coreutils";
- Retrieve the source from http://packages.ubuntu.com/hardy/coreutils;
- Untar, change dir to coreutils-6.10 and following instructions from file debian/README.build run command "debian/rules setup";
- Now change dir to build-tree/coreutils-6.10 and run " CFLAGS='-g' ./configure";
- Finally, do "make";
- Now your fresh debuggable "ls" is available as "src/ls".
Anyway, it quickly turned out "ls" is calling function getfilecon() and upon receiving some non-trivial output appends "+" markup.
So, what is getfilecon()? It is part of SELinux toolkit; SELinux is, of course, a special security-enhancement system for Linux, which is totally separate from traditional Linux access restriction tools, including ACL; it works by assigning special "roles" to files, processes and users and then keeping a (potentially) huge policy database of who-can-do-what; it was originally developed by NSA and open-sourced in 2000.
On a practical level, SELinux-enabled system (Ubuntu Hardy being one of them) have special CLI switch "-Z" for many file and process-management utilities to report/take into account SELinux "context". Indeed, this finally allowed me to solve first piece of the mystery - force "ls" to tell me what it means my "+", by using "-Z":
% ls -1Z
user_u:object_r:file_t DivX
user_u:object_r:file_t Raw
The only trouble is, of course, that SELinux was never enabled on my system! This could be seen with e.g. "id -Z"
% id -Z
id: --context (-Z) works only on an SELinux-enabled kernel
Anyway, enough suspence, here is what (I think) is going on. Not unlike ACL, SELinux keeps its "context" in extended attributes. Whether kernel has SELinux enabled or not, utilities which are told to assign certain SELinux "types" to files, are free to do so using e.g. setfattr. These attributes, of course, will have no impact whatsoever on security of the system, but will be reported by utilities like "ls" which, again, simply looks at the specific attribute.
In fact, the name of this attribute is "security.selinux"; indeed, I can verify this with "getfattr" :
% getfattr -n security.selinux -d Raw
# file: Raw
security.selinux="user_u:object_r:file_t\000"
So why woudn't "getfattr -d" report this? Isn't it in the absence of "-n" supposed to return all attributes?
Well, yes and no. By default, it reports all user attributes, that is, attributes with names which begin with "user.". To truly report all attributes, add "-m -" :
% getfattr -m - -d Raw
# file: Raw
security.selinux="user_u:object_r:file_t\000"
You can, of course, assign this attribute with command "setfattr -n security.selinux -v <value> <file name>" or remove it altogether with "setfattr -x security.selinux <file name>".
This, finally, answers the question we asked in the beginning - how to remove this "plus" from "ls -l" output - and thus concluded our investigation.
Bonus track. Some SELinux-related references:
Labels: ACL, linux, Samba, SELinux, Ubuntu, xattr
Sunday, July 27, 2008
Accessing SMB shares under firewall
There are, generally speaking, five "standard" ways to make files on (Linux) server available to clients:
- Using FTP server;
- If sshd is running, files could be accessed with SFTP;
- If Web server is running, WebDAV could be used;
- Using NFS (see earlier port);
- Using SMB-shares.
In principle, last choice - using Samba shares - is supposed to be most "native" with respect to Windows clients; let's consider how difficult it is to use it practically...
For the following, we assume that SMB server is running on "SERVER" and we'll be using it to access file of local regular user "user".
1. Install and configure samba
1.1. Install
# apt-get install samba smbclient
1.2. Modify config file.
Here we zero in on "minimalistic" approach, which only requires minimal changes to default config file (as distributed with Debian, anyway). It has one built-in share "homes" which provides access to each user's home directory (it is enabled by default, but in read-only mode)
1.2.1. Backup default config file:
cp /etc/samba/smb.conf /etc/samba/smb.conf.original
1.2.2. Modify global settings:
workgroup = <Enter some name>
interfaces = <enter some interfaces from /sbin/ifconfig, e.g. lo venet0:0>
printcap name = /dev/null (shut down all complaints in logs about printers)
encrypt passwords = yes (or else you won't connect from Windows NT and up)
security = user (this should be the default anyway)
smb passwd file = /etc/samba/smbpasswd (see below why/when this is necessary)
1.2.3. Modify setting for share.
If you are satisfied with read-only access to user's directory, there is nothing more to change. If you want read-write access, there are some settings to adjust:
writable = yes
create mask = 0644
directory mask = 0755
Note on "encrypt password": if encrypt password = false, you don't need "smb passwd file", system password file will be used. For some reason it did NOT work for me if "encrypt password = true". As suggested in [8], I did this:
cat /etc/passwd | mksmbpasswd > /etc/samba/smbpasswd
smbpasswd user (for each use who needs his home dir access via SMB)
1.2.4. Restart server:
/etc/init.d/samba restart
1.2.5. Test installation (on the server as user)
smbclient //localhost/homes
If you can, test from another location which does not block outgoing ports 139, 445
smbclient //SERVER/homes -U user
2. Setup Windows computer
In principle, the following command
net use [<drive letter>:] \\SERVER\homes /user:user /persistent:no
should be able to mount corresponding share. However, for this to work it is necessary that client computer had direct access to server using ports 139 and/or 445. If server is to be used in local subnet, this is undoubtedly so and no more setup is required. However, if you are accessing server from the Internet, and your ISP is blocking these ports (like RCN), read on.
The idea is to try to mount SMB shares on SERVER as if they were available on localhost; intercept requests made on (local) ports 139 and 445 and somehow forward them to SERVER.
This however appears to be more difficult than it sounds. The problem is, Windows by default binds all adapters on port 445 :
> netstat -ano | grep 445
TCP 0.0.0.0:445 0.0.0.0:0 LISTENING 4
and the only way to make this port available for binding is to disable NetBios completely, which is rather pointless, since then you won't be able to amount anything at all (if, however, you want to play with this, refer to [5] and [6]).
Fortunately, however, usually Windows, after failing to mount using port 445, falls back to port 139, which apparently you can bind, albeit not on "standard" loopback adapter 127.0.0.1; (well, you can bind to it, but it won't work for whatever reason), thus necessity to create new loopback connection. This "fallback" logic is in no way guaranteed and moreover has reportedly been broken by a recent Vista patch; but at least on XP this seems to work, as long as you implement 2.1 and 2.2 below.
2.1. If you are using Windows XP, install this Windows patch [3].
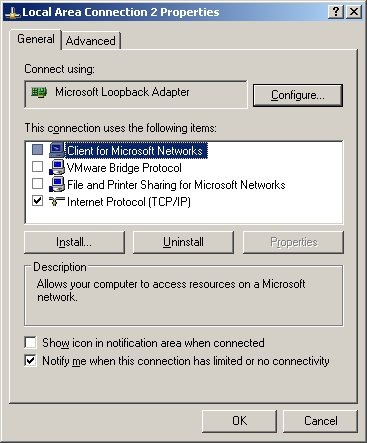 2.2. For your existing Internet connection, enable option "EnableBIOS over TCP/IP" (in fact, it may be sufficient to do so for any Internet connection. Quoting from [1]: "It also appears that if there are no valid interfaces with NetBIOS over tcp enabled, then windows will not attempt to use port 139")
2.3. Add new Microsoft loopback interface and bind it to port 10.0.0.1, see [4] and [1] ([4] has some screenshots from Vista; XP installation is similar).
2.4. It may or may not be necessary, but I also (a) disabled all "items" for new 10.0.0.1 loopback connection (except TCP/IP, see first screenshot above) ; (b) enabled LMHOSTS lookup; (c) disabled NetBIOS over TCP/IP (see second screenshot) ; (d) disabled "File and 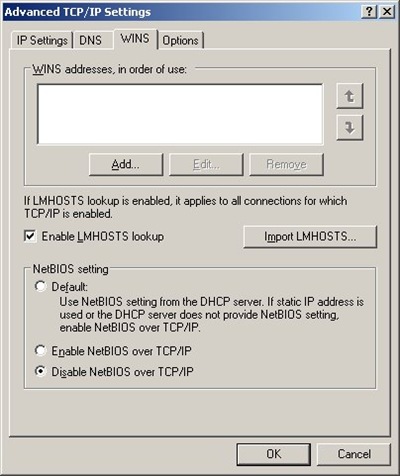 Printer Sharing for Microsoft Networks" for ALL connections;
2.5. Reboot and you are all set!
3. Setup port forwarding
This can be done in one of the two ways.
You can use of the many existing utilities for port forwarding. (It is more correct in fact to speak of reversed port forwarding, but people usually call it port forwarding all the same). In this case you need a (non-blocked) port to forward to, and your Samba server should be told to listen on this port.
Alternatively, you can use ssh port tunneling capability and tunnel port 139 through ssh. This requires more complicated setup and is more difficult to automate, but does not require any additional port to be used and has an additional benefit of securing your Samba traffic via ssh.
3.1. Using ssh tunneling.
3.1.1. With Cygwin (or similar CLI) ssh:
ssh -L 10.0.0.1:139:localhost:139 SERVER
3.1.2. Using PuTTY
(see screenshot in [4]). There are various ways to automate this using pageant, but I won't get into this here.
3.2. Using port forwarding.
3.2.1. Add another option to smb.conf :
smb ports = 445 139 8445 8139
3.2.2. Configure AUTAPF (shareware) or PassPort (Open Source) to forward port 139 on local adapter 10.0.0.1 to port 8139 on SERVER.
AUTAPF is more convenient as it immediately tells you if it can't bind a port thus it is better for testing; once you are comfortable with the setup, you can switch to free PassPort.
4. Using SMB shares
4.1. Under Windows
net use [<drive letter>:] \\10.0.0.1\homes /user:user /persistent:no
(Unless user if Windows user name and password matches, you'll be asked to enter server password at this point)
4.2. Under Linux
Make sure you have "smbfs" installed ("apt-get install smbfs") and issue this command as super-user:
mount -t smbfs -o username=user%<user password>,uid=<local username>,port=8139 //SERVER/homes <local mount point>
(You can use option -credential in place of plain text user name/password, see "man smbmount" and this page)
4.3. Using smbclient, any platform
For any platform which has utility "smbclient" or equivalent, and provided that you've configured SMB server to listen to port 8138, you can use this
smbclient //SERVER/homes -U user -p 8139
to access your files.
You can get MinGW-based smbclient.exe for Windows from here (it works fine except that you have to specify password in the command line); alternatively, you can build your own Cygwin-based version using one of the patched published here (you'll need to disable first test in Samba source file source/tests/summary.c)
References:
[1] Sharing (tunneling) Samba/CIFS/SMB file systems over SSH
[2] How to tunnel Samba via ssh from Windows XP without having to disable local NetBIOS
[3] Programs that connect to IP addresses that are in the loopback address range may not work as you expect in Windows XP Service Pack 2
[4] Vista or XP Accessing Samba shares securely over SSH
[5] Disabling Port 445 (SMB) Entirely
[6] After you disable the "Client for Microsoft Networks" option for a dial-up connection, the dial-up connection is still active on a Windows XP-based computer
[7] "Network Location Cannot be Reached" when accessing shares
[8] SMBCLIENT CONNECTION ERROR
Labels: debian, linux, Samba, server, SMB, windows
Sunday, July 20, 2008
Installing TTF fonts under Debian
I am still not sure I am fully understand the inner workings of fonts under Linux; using hints from this page, here is how I recently installed RedHat Liberations fonts under Debian:
cd /tmp
# using link from https://fedorahosted.org/liberation-fonts
wget https://fedorahosted.org/releases/l/i/liberation-fonts/liberation-fonts-1.04.tar.gz
tar -xvzf liberation-fonts-1.04.tar.gz
cd liberation-fonts-1.04
# remove everything except font *.ttf files
rm `ls -1 | grep -iv \.ttf$`
# I prefer to install under /usr/local, but it's irrelevant
mkdir -p /usr/local/share/fonts/truetype
cp -pr /tmp/liberation-fonts-1.04  /usr/local/share/fonts/truetype/liberation-fonts
# defoma is Perl-based; for some reason, some required Perl dependencies weren't
# installed by default
apt-get install libft-perl
defoma-hints -c --no-question truetype \
            /usr/local/share/fonts/truetype/liberation-fonts/* >
            /etc/defoma/hints/liberation-fonts.hints
defoma-font register-all /etc/defoma/hints/liberation-fonts.hints
defoma-reconfigure
xset fp rehash
I just hope one day I'll understand what all of that really means....
Labels: debian, fonts, linux, redhat
Friday, June 27, 2008
Backing store
"Backing store" is an old, albeit not well-known, feature of X servers, going back to the 80's or may be even before that. More often when not, servers do not enable it by default, and then users are left to search through server customization option to discover appropriate magic to enable it.
This page, which, I believe, is devoted to some specific Java drawing problems, has some good and concise explanation of "backing store" mechanism (emphasis added):
Usage of backing store is another way of improving our painting procedure. Backing store is a feature of most of X servers: provided that a window has the backing store attribute set, such an X server automatically maintains the contents of the window while it is obscured. When (a part of) a window is exposed, its contents is automatically copied to the screen, and expose events are not generated as the contents is restored. Though the attribute is only a hint to an X server.
Backing store does conflict with DGA, so backing store attribute is not set for a window if Java2D uses DGA on at least one screen. (DGA is used only on some Solaris/SPARC machines.)
To allow setting of the backing store attribute for a window (if DGA is used), one may set the env var NO_J2D_DGA; refer to http://java.sun.com/j2se/1.5.0/docs/guide/2d/flags.html.
To leverage backing store feature, in addition to setting of the backing store attribute for a window, the X server must have backing store support enabled. One should consult his/her X server documentation in order to enable X server's support for backing store. Let's consider typical setting of 3 most popular X servers.
- Xsun has backing store support enabled by default.
- XFree86: put
Option "backingstore"
in each Screen section of /etc/X11/XF86Config-4 or /etc/X11/XF86Config if the former isn't present. (See also http://www.xfree86.org/current/ati5.html)- Xorg: put
Option "backingstore"
in each Screen section of /etc/X11/xorg.conf. (See also http://www.x.org/X11R6.8.2/doc/ati5.html)
It turns out that there is also option "SaveUnders" somehow related to this. In any case, this is an example of "Screen" section of /etc/X11/xorg.conf with backing store enabled:
Section "Screen"
   Identifier     "Screen0"
   Device         "Device0"
   Monitor        "Monitor0"
   DefaultDepth    24
   Option "BackingStore" "on"
   Option "SaveUnders" "on"
   SubSection     "Display"
       Depth       24
   EndSubSection
EndSection
Enjoy!
Labels: linux, solaris, xwindows
Thursday, June 05, 2008
Google gadgets for Linux
 Google released Google gadgets for Linux, as an open-source project. After a few trials-and-errors, I managed to set it up on my Ubuntu 8.04 64-bit.
- Install the following packages: libgtk2.0-dev libmozjs-dev libxul-dev libcurl4-openssl-dev libgstreamer0.10-dev libgstreamer-plugins-base0.10-dev libdbus-1-dev libxml2-dev librsvg2-dev spidermonkey-bin libxcomposite1 xcompmgr (Not sure all are really required, but just in case) Also, some qt-related (development) packages are required if you want QT support.
- Download google-gadgets-for-linux-0.9.1.tar.gz .
- Untar, configure and make will all the default options. Install additional packages if required.
- Enable "composite mode" in X-server, by adding these lines to /etc/X11/xorg.conf :
Section "Extensions"
Option "Composite" "Enable"
EndSection
Re-login to force server restart. - In a separate window, start: xcompmgr -o 10
- And finally, in another shell start Google Gadgets as ggl-gtk or ggl-qt. You may need to add /usr/local/bin to you $PATH and /usr/local/lib to you $LD_LIBRARY_PATH.
- You can now add gadgets through UI or by passing .gg file directly to the command line, e.g.: ggl-gtk ~/Download/Tetris-1.3.gg
Labels: google, linux, xwindows
Thursday, May 15, 2008
Using NFS mounts under Windows
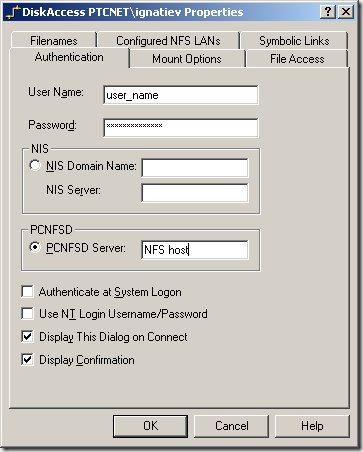 When one needs to access files on remote Linux workstation from a windows computer, there are two obvious ways in which this can be done: run Samba server on Linux or NFS client on Windows. While former approach is I guess by far more popular, here I will consider later one: sharing files via NFS client/server.
First, we need to install a NFS client. I don't know of any free one, and perhaps the best known and reliable commercial solution is DiskAccess from Javvin Technologies. Installation is straightforward.
Problems begin though when it turns out that in order to access NFS file system with DiskAccess one needs certain authentication configuration setup. This could be and is done in a corporate environments with NIS (formerly Yellow Page server).
However, when we only have two machines that need to talk to each other, this might be an overkill and a disaster to setup. This is perhaps why there is another option in aforementioned dialog, "PCNFSD Server". What is that?
As the name suggests, this is perhaps mini-daemon intended to facilitate communication between "PC" and NFS server. This sounds good, except that this utility is barely known even to Google, isn't in any Linux distribution, and as a matter of a fact "canonical" version from SUN is perhaps older than Linux itself.
Fortunately, one kind soul invested necessary effort to port this to Linux
- Get it here: http://ftp.linux.org.uk/pub/linux/Networking/attic/Other/pcnfsd/linux_pcnfsd2.tgz, untar and unzip into a new directory;
- Edit file common.h to uncomment "#define SHADOW_SUPPORT"
- Make other changes necessary to build successfully. On RHE4, I had to define "LIBS= -lcrypt" in Makefile.linux;
- make -f Makefile.linux
- Run linux/rpc.pcnfsd as root. No configuration is required.
Fast, simple, and keeps DiskAccess happy.
Of course, what remains to be done is to "export" a directory and "mount" it under Windows.
To export directory /ext/user on RHE4:
- Add line like this:
/ext/user 192.168.2.1/255.255.252.0(sync,rw)
to file /etc/exports (provided that this IP subnet is an accurate description of your local net, this will export directory in read-write mode to the local file system only. You can substitute '*' for IP range if security is not on the top of your priorities list); - Reset list of exported directories with /usr/sbin/exportfs -r or /usr/sbin/exportfs -a ;
- While this is supposed to be enough, you may need to restart NFS server with command like this: /etc/rc.d/init.d/nfs restart
To mount exported NFS directory under Windows,
- Once after DiskAccess installation, go to control panel, select DiskAccess item and enter your credentials, and set other options as you see fit;
- You can now mount with regular Windows UI or with command like this:
net use R: \\nfs_host\ext\user
You shouldn't be forced to use drive letter, but for some reason it didn't work for me without that.
Labels: linux, NFS, server, windows
Friday, April 04, 2008
Global $PATH with Debian
Let's say I want to add new directory to "global" system $PATH. That is, I want all applications, no matter how started, from the command line or from GUI, no matter by what user, is to be able to find executables in certain directory, among others like "/usr" or "/usr/local/bin".
Interestingly, there is no simple or at least standard way of accomplishing this simple task.
On a very basic level, there are two main "sources" of the environment
1. Shell initialization file, system-wide or per-user. For "bash", these are:
/etc/bash.bashrc
/etc/profile
~/.bashrc
~/.profile
~/.bash_profile
It is important that all files from this list which have "profile" in their names are only invoked by "login" shells; that is, only for shells which are invoked when user logins remotely to the system or for shells started with "--login" (or just "-l") command line options.
2. Various "display managers", like GDM = "Gnome Display Manager".
Now, here is a tricky part: I could not figure it out how GDM sets it environments. Environment itself which comes out from GDM is actually identical to that set up in file /etc/login.defs, but changing said file appears to have no effect.
However, there is another file which GDM appears to honor: /etc/environment (note that this is NOT a bash script, but a simple configuration file). And yes, you can add PATH definition there and GDM will use it with no interference.
The only problem is that GNOME (and all other modern desktops) have a feature "run as root", and that requires different environment (again, I believe default one is identical to one defined in /etc/login.defs).
Given this situation, there are two basic strategies to define your system $PATH. You can of course customize both to fit your needs.
Approach 1 is described here.
The basic idea is that if there is a local user-defined executable file ~/.xsession, GDM will invoke it when firing up default user session. Therefore, this ~/.xsession file
#! /bin/bash --login
exec x-session-manager
makes sure windows environment is consistent with login environment.
Of course, you can change header to simply "#! /bin/sh" and set any environment you want in the same file before invoking x-session-manager.
Approach 2
Set your global $PATH in /etc/environment, but then make sure it is good both for regular login and applications requiring super-user privileges. Here is mine:
PATH=/usr/local/bin:/opt/jdk/bin:/usr/bin:/bin:/usr/bin/X11:/usr/games:/sbin:/usr/sbin
You can and probably should customize your bash configuration files to set local $PATH for user (by default, file ~/.bash_profile prepends "~/bin" to $PATH)
Tuesday, March 18, 2008
Installing Mono with yum
Creators of Mono so far haven't made it very simple to install; precompiled binaries exist only for few not the most popular distributions like Red Hat Enterprise 4 or OpenSuSe 10.3. But even there, it is a bit of a pain to download, verify dependencies and install all required packages.
One tool suggested to help somewhat with with problem is yum. Today we will talk about what it takes to use yam on Red Hat Enterprise 4 to install latest Mono release.
Note that at any point during that process it may turn out that your system is missing some requirements which mine didn't; it is assumed you know to to locate missing packages on whatever media you are using and install them.
We begin by installing certain prerequisites of yum. All of them are python packages, and all of them should be compatible with python 2.3.4 which comes with RHE4; upgrading to a newer python version may be possible, but not recommended since yum also depends on python package rpm, which is part of RedHat distribution.
- urlgrabber.
cd /tmp
wget http://linux.duke.edu/projects/urlgrabber/download/urlgrabber-3.1.0.tar.gz
tar -xvzf urlgrabber-3.1.0.tar.gz
cd urlgrabber-3.1.0
python setup.py build
python setup.py install
- ElementTree. Using http://effbot.org/media/downloads/elementtree-1.2-20040618.tar.gz, same procedure as above;
- cElementTree.
Using http://effbot.org/media/downloads/cElementTree-1.0.5-20051216.tar.gz, same procedure as above.
cd /tmp
wget http://linux.duke.edu/projects/yum/download/2.6/yum-2.6.1.tar.gz
tar -xvzf yum-2.6.1.tar.gz
cd yum-2.6.1
make DESTDIR=/
make DESTDIR=/ install
Make sure yum module loads properly, and fix problems if there are any :
[root@myRHE4 ~]# python
Python 2.3.4 (#1, Jan  9 2007, 16:40:18)
[GCC 3.4.6 20060404 (Red Hat 3.4.6-3)] on linux2
Type "help", "copyright", "credits" or "license" for more information.
>>> import yum
>>>
Create info about mono repository:
cd /etc/yum.repos.d
wget http://www.go-mono.com/download-stable/rhel-4-i386/mono.repo
You're ready to begin installation! Here is what I installed:
yum install mono-complete
yum install gtk-sharp2-complete
yum install mono-basic
yum install mono-debugger
One last item - optional, but nice - it is to make sure Linux kernel can run your Mono applications "natively" (like Windows), without using "mono" every time. Following these directions, create script like that:
#! /bin/bash
if [ ! -e /proc/sys/fs/binfmt_misc/register ]; then
    /sbin/modprobe binfmt_misc
    # Some distributions, like Fedora Core, perform
    # the following command automatically when the
    # binfmt_misc module is loaded into the kernel.
    # Thus, it is possible that the following line
    # is not needed at all. Look at /etc/modprobe.conf
    # to check whether this is applicable or not.
    mount -t binfmt_misc none /proc/sys/fs/binfmt_misc
fi

# Register support for .NET CLR binaries
if [ -e /proc/sys/fs/binfmt_misc/register ]; then
    # Replace /usr/bin/mono with the correct pathname to
    # the Mono CLR runtime (usually /usr/local/bin/mono
    # when compiling from sources or CVS).
    echo ':CLR:M::MZ::/usr/bin/mono:' > /proc/sys/fs/binfmt_misc/register
else
    echo "No binfmt_misc support"
    exit 1
fi
and run it as root (or append to file /etc/rc.local as suggested)
To verify your installation, use program "Hello, World!" from here :
using Gtk;
using System;

class Hello {

static void Main()
{
Application.Init ();

// Set up a button object.
Button btn = new Button ("Hello World");
// when this button is clicked, it'll run hello()
btn.Clicked += new EventHandler (hello);

Window window = new Window ("helloworld");
// when this window is deleted, it'll run delete_event()
window.DeleteEvent += delete_event;

// Add the button to the window and display everything
window.Add (btn);
window.ShowAll ();

Application.Run ();
}

// runs when the user deletes the window using the "close
// window" widget in the window frame.
static void delete_event (object obj, DeleteEventArgs args)
{
Application.Quit ();
}

// runs when the button is clicked.
static void hello (object obj, EventArgs args)
{
Console.WriteLine("Hello World");
Application.Quit ();
}
}
To compile and run:
gmcs helloworld.cs -pkg:gtk-sharp-2.0
./helloworld.exe
Labels: linux, mono, redhat, yum
Wednesday, October 24, 2007
Hebrew fonts

Friday, September 14, 2007
Copy DVD
Well, the next best thing after using gmplayer is copying (protected) DVDs. Number of good utilities exist under Windows, e.g. free DVD Decrypter and non-free but very good Magic DVD Ripper. Here we will cover what is available under Linux.
First, very good review, and only slightly outdated, is available in Gentoo Wiki. In fact, from all the tools mentioned there I only tried the simplest one: dvdbackup.
Here is what to do:
- Install libdvdcss ;
- Install libdvdread . Run configure command like that: ./configure --with-libdvdcss-libs=/usr/local/lib
- Get dvdbackup;
- Goto "src" subdirectory;
- (optional) Consider applying this patch;
- Compile dvdbackup like that: gcc -I/usr/local/include dvdbackup.c -o dvdbackup /usr/local/lib/libdvdread.a /usr/local/lib/libdvdcss.a -ldl (Note: linking libdvdread.so does not work for some reason, but feel free to use libdvdcss.so)
- Copy dvdbackup to /usr/local/bin or whatever
- Use like that:
(to copy DVD)
dvdbackup -v 4 -M -i /media/cdrecorder -o ~/mytopdir -n my_name
(to get info)
dvdbackup -i /media/cdrecorder -I
gmplayer dvd://1 -dvd-device ~/mytopdir/my_name

